Indoor Golf Simulator Bay Setup: Room Size, Net, Screen, Projector And Safety (2026 Guide)
When most golfers talk about a home golf simulator, what they really want is not just numbers on a launch monitor. They want a bay that feels like a real hitting lane: a safe impact area, a clear picture, enough room to swing every club, and a setup that does not scare the rest of the household.
The problem is that a lot of indoor golf simulator advice lives in scattered forum posts and product specs, so people end up guessing:
-
Is my ceiling high enough?
-
How far from the screen should I stand?
-
Where does the projector actually go so I am not swinging through the light beam?
-
How do I make sure a bad swing does not find a wall, a window or a car?
In this guide, we will walk through the full indoor simulator bay setup step by step - room size, net and screen, projector placement, launch monitor positioning and safety. At The Net Return, we have seen golfers build bays in single-car garages, basements and spare rooms, and the same fundamentals show up every time, so that is what you will see here.
What An Indoor Simulator Bay Actually Includes
Before you even pick up a tape measure, it helps to know what you are actually trying to fit into your room. An indoor golf simulator bay is not just a net in a corner, it is a small ecosystem.
At the simplest level, a bay usually contains:
-
Hitting Area
A hitting mat or strip of turf where you place the ball and stand. This is where your swing happens, so it must be flat, stable and sized for your stance. -
Net And/Or Impact Screen
A golf practice net or a full impact screen that catches the ball. In a simulator bay the screen is usually the main target because it also shows your virtual course or range. -
Side Barriers Or Enclosure
Netting or curtains on the sides (and often above) that keep mishits and high shots from leaving the hitting lane. -
Launch Monitor
A device that measures ball and club data. It can sit on the floor beside the ball, behind the player, or overhead, depending on the model. -
Projector (For Visual Simulator Experience)
A projector that throws the image onto the screen so you are not looking at a laptop on a stand. -
Safety And Comfort Details
Floor protection, cable management, padding on exposed frame pieces, lighting and sometimes seating or a small console.
You can run a basic golf simulator with just a hitting mat, a net and a launch monitor. The moment you add a screen and a projector, it becomes a true indoor golf simulator bay, and that is when room size, distances and safety start to matter a lot more.
Room Size And Ceiling Height: Can Your Space Handle A Simulator Bay
One of the most common questions people ask is simply, “Can my room even take an indoor golf simulator without feeling dangerous?” The honest answer starts with three measurements: height, width and depth.
Ceiling Height
Ceiling height is usually the hardest limit.
-
For comfortable driver swings, most golfers need around 9-10 feet of clear height.
-
If you or anyone using the bay is tall or has a very upright swing, more is always better.
-
At around 8 feet, you may manage irons or shorter clubs, but many players will feel cramped or start changing their motion to avoid the ceiling.
When you measure, do not just look at the highest point. Note:
-
The lowest point a club could touch - beams, garage door tracks, light fixtures, fans.
-
Any sloping ceilings that reduce height near the hitting area.
Room Width
Next is width. For a centered bay that works for both right- and left-handed players, you ideally want:
-
Around 10-12 feet of width.
This gives you room for:
-
The screen or net itself.
-
A bit of margin on either side.
-
Stance and swing path without scraping walls.
If you only have 9 feet of width, it can still be workable for a single right-handed player with careful layout, but side protection becomes much more important.
Room Depth
Depth is where many people underestimate what a golf simulator really needs.
Think of depth as three slices:
-
Gap behind the screen or net (around 1 foot).
-
Distance from tee to screen (around 10-12 feet).
-
Space behind the player (around 6-7 feet).
Add those together and you arrive at:
-
A comfortable minimum depth of 17-20 feet for a full bay.
You can squeeze this down a bit with shorter tee-to-screen distances and tighter space behind the player, but at some point it stops feeling like a bay and starts feeling like a cupboard. The goal is not perfection; it is a room where you can swing freely without constantly worrying about a wall behind you or a ball flying back at you
Laying Out Net, Screen And Tee: Distances That Actually Work
Once you know the rough size of your room, the next step is to decide where everything sits. This is where a few key distances will save you from trial and error.
Screen Or Net To Back Wall
An impact screen or net should not be pressed flat against the wall. Leaving a gap allows the material to absorb the ball’s energy.
-
Aim for 12-16 inches between the back wall and the screen or primary net.
-
If you are in a very tight room, try not to go below 8-10 inches; otherwise the ball can hit the wall behind the screen and bounce back harder than you want.
Tee To Screen Or Net
This is the distance that most directly affects safety and feel.
-
A good working range is 10-12 feet from the ball to the impact screen or net.
At around 10-12 feet:
-
The ball has room to launch, travel and rise into the middle of the screen.
-
Bounce-back is manageable when you combine the right screen material and a soft landing area.
-
Most launch monitors track the ball accurately without needing extra space.
If you have more depth, you can go slightly further away, but you start to reduce image size for a given projector and you might push yourself too close to the back wall.
Space Behind The Player
Many people forget the space behind the hitting area. You need:
-
Ideally 6-7 feet between the back of your stance and the wall or any stored items.
This gives you:
-
Room for a natural backswing.
-
Space for a radar-based launch monitor behind you, if you choose that style.
-
Enough distance for a second person to stand safely behind and watch without crowding your swing.
Visualizing The Layout
If you sketch the bay from the side, a simple layout looks like this:
-
Back wall
-
1 ft gap
-
Impact screen or net
-
10-11 ft
-
Hitting mat and ball
-
6-7 ft
-
Back wall or garage door
When customers send us room measurements at The Net Return, this is often the first drawing we talk through with them, because once those three zones are clear, the rest of the design becomes much easier.
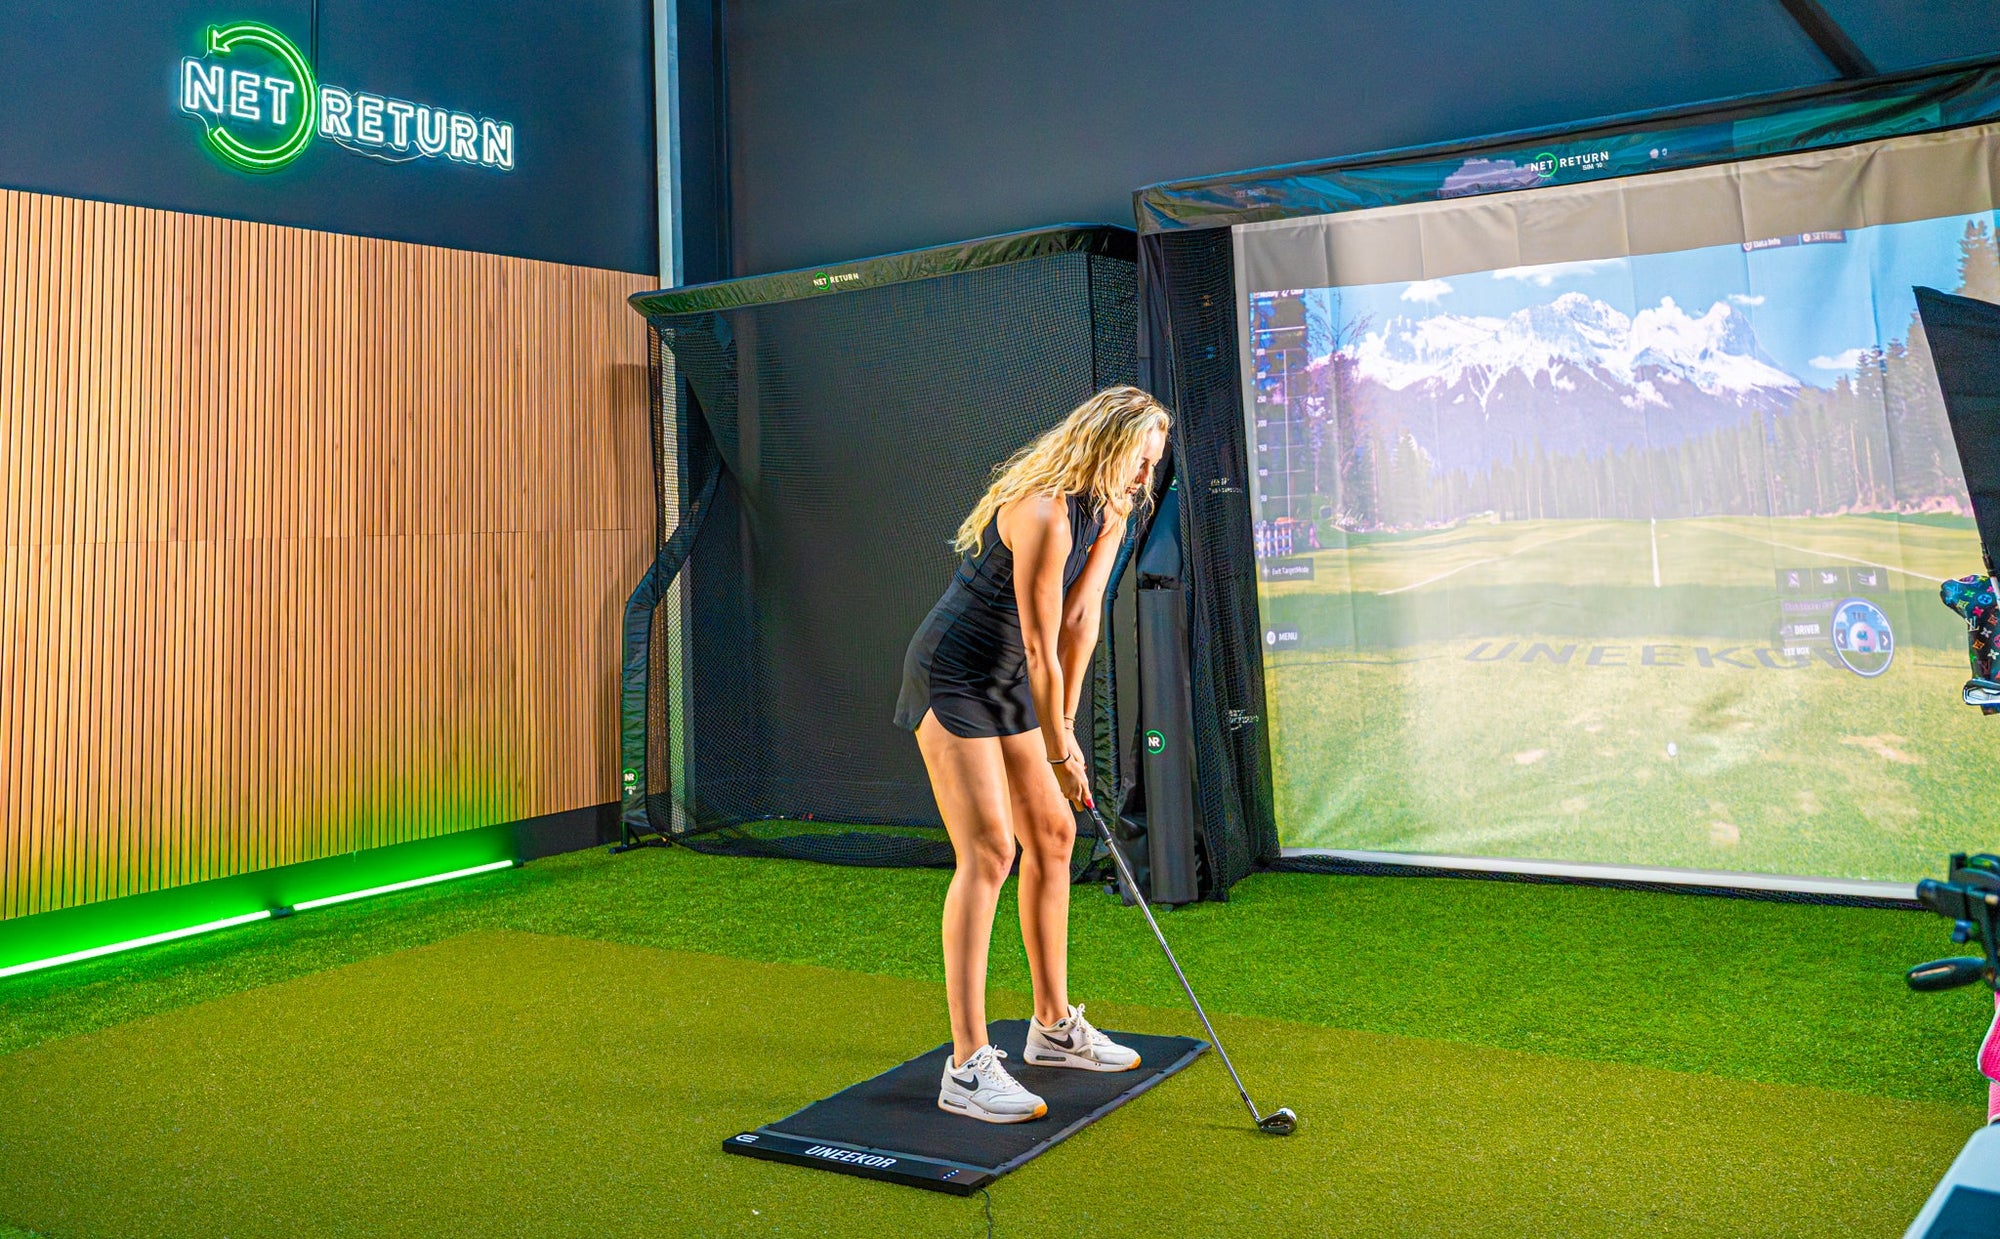
Projector And Launch Monitor Positioning: Keeping Shadows Out Of Your Swing
Getting the golf simulator hardware in the right place is just as important as hanging the screen. Projector and launch monitor positioning is where a lot of bays go wrong at first attempt.
Launch Monitor Placement
How you place the launch monitor depends on the type you choose.
-
Floor-Based Camera Units (Beside The Ball)
Devices that sit just in front of or beside the ball usually need: -
A flat, level surface next to the mat.
-
A clear view of the hitting zone and initial ball flight.
You must keep this area free of loose balls and cables. -
Radar Units (Behind The Player)
Units that sit behind you look down the target line and track the ball in flight. They usually require: -
Enough depth behind the golfer.
-
A clear line of sight to the screen without people walking through the radar beam.
-
Overhead Units
Ceiling-mounted systems sit above the hitting area and look straight down. They demand: -
Secure mounting points in the ceiling.
-
Sufficient ceiling height and exact positioning relative to the mat.
Whatever style you choose, plan the launch monitor first, because once you know where it must live, you can work the projector around it.
Projector Throw Distance And Mounting
With projectors, you are juggling three things: image size, distance and the position of the light beam relative to your swing.
A few guiding ideas:
-
Throw Distance
For a typical 4:3 or 16:9 screen in a home bay, many people end up with the projector roughly 9-12 feet from the screen, depending on throw ratio. Short-throw projectors need less distance, standard-throw projectors need more. -
Mount Position
The safest and cleanest option is usually a ceiling mount: -
Slightly ahead of the player, closer to the screen than to the ball.
-
Offset just enough so that your swing arc and club do not pass directly under the projector.
-
Avoiding Shadows And Glare
If the projector is too far back or directly above the ball, you may find yourself swinging through the beam and seeing your own silhouette on the screen. Moving it forward and slightly to the side, then keystone-correcting if needed, keeps the picture usable and your eyes comfortable.
Planning cable routes at this stage is important. Think about where power sockets are, how you will route HDMI or network cables, and how you will keep those lines away from your feet and from the launch monitor.
Safety First: Bounce-Back, Windows, Family And Miss-Hits
An indoor golf simulator bay has to do more than just look good in photos. It has to be trusted by everyone who lives around it. That means taking safety seriously from day one.
Managing Bounce-Back
Bounce-back is what happens when:
-
The ball hits a very tight, flat screen or net.
-
There is a wall directly behind the screen.
-
There is hard flooring right under the landing area.
To keep it under control:
-
Maintain that 12-16 inch gap behind the screen or net wherever possible.
-
Choose an impact screen that is designed specifically for golf use.
-
Lay down a strip of turf or carpet extending a few feet out from the screen so the ball can land and roll, rather than ricocheting.
Side Protection
Not every shot goes straight. For many golfers, the real risk is a heel or toe strike that sends the ball sharply left or right.
You can handle this with:
-
Side Nets Or Curtains
Hanging netting or heavy curtains along the side walls of the bay to catch wild shots. -
Extended Enclosures
Using a full enclosure that wraps the top and sides so the bay becomes a complete box around the hitting lane.
This is especially important in:
-
Narrow rooms where walls are close to your swing.
-
Spaces with windows, mirrors or TVs along the side.
Ceiling And Fixtures
Look up, not just around.
-
Remove or relocate any hanging lights, fans or decorations that might be in your swing path.
-
Use recessed or track lighting set outside the swing arc and aimed towards the screen or down the sides of the bay.
A clean ceiling zone above and slightly behind the ball is a big part of feeling relaxed when you swing.
Doors, Walkways And Human Traffic
Think carefully about how people move through the room.
-
Avoid building your bay directly across a doorway, hallway or main walkway.
-
Use visual cues like floor tape or small barriers to mark the “do not cross” line behind the golfer.
If others will be walking through the area while you practice, set one simple house rule: nobody crosses behind the player when the bay is in use.
Noise And Neighbours
Sim bays in garages and apartments can be loud.
-
Extra padding behind the screen, rugs on concrete floors, and soft netting all help reduce the sharpness of impact sounds.
-
If you plan to use the bay late at night or early in the morning, these small upgrades can make a big difference to neighbours and family.
Safety is not about removing all risk; it is about designing the bay so everyone involved feels confident that even a very bad swing will not do damage.
Example Bay Layouts For Real Rooms (Garage, Basement, Spare Room)
We can talk about dimensions all day, but it only really clicks when you see how a full indoor golf simulator bay fits into an actual room. Here are three common scenarios.
Single-Car Garage Bay
Room sketch
-
Width: about 10 feet.
-
Depth: about 20 feet.
-
Height: about 9 feet to the lowest point.
Layout recipe
-
Mount the impact screen and net frame against the back wall with a 1 foot gap behind.
-
Place the hitting mat so the ball sits 10-11 feet from the screen.
-
Leave 6-7 feet behind the mat to the garage door or storage shelves.
-
Mount the projector in the ceiling, around 9-10 feet from the screen, slightly ahead of the hitting position.
-
Put a radar-based launch monitor behind the golfer, centered on the ball-to-screen line.
Compromises
-
You may need to park the car outside when using the bay.
-
Storage along the sides should be kept low and protected by side nets.
Many golfers use this exact pattern with our nets and screens at The Net Return because it lets them keep the bay permanently mounted at the back while the rest of the garage remains usable.
Basement Or Bonus Room Bay
Room sketch
-
Width: 12-14 feet.
-
Depth: 18-20 feet.
-
Height: 9-10 feet.
Layout recipe
-
Build a full enclosure or net and screen assembly across one end of the room.
-
Maintain that 1 foot gap behind the screen.
-
Place the hitting mat 10-12 feet from the screen depending on how deep the room is.
-
Use an overhead or side-mounted camera-based launch monitor near the ball.
-
Mount the projector on the ceiling, slightly offset to avoid shadows, aligning the image with the screen width.
Compromises
-
If the ceiling is on the lower side, you may limit tall players or full-speed driver swings.
-
You will want to pay attention to sound insulation if the room is under bedrooms or neighbours.
This kind of bay can feel like a dedicated simulator room with space for a small seating area behind the hitting mat.
Dual-Use Office Or Spare Room Bay
Room sketch
-
Width: around 11-12 feet.
-
Depth: 15-17 feet.
-
Height: around 9 feet.
Layout recipe
-
Use a net and screen system that can be folded or retracted when not in use.
-
Place the screen/net at one end, keeping a 10-11 foot tee-to-screen distance.
-
Use a roll-up or foldable hitting mat.
-
Mount the projector using a ceiling mount or a movable floor stand that can be parked away when not in use.
-
Keep the launch monitor on a small stand or tripod that tucks away in a corner.
Compromises
-
You may not have enough room for a full enclosure, so side curtains or net panels become more important.
-
Desk and office furniture need to be positioned outside of the shank zone.
In rooms like this, the bay needs to disappear emotionally when you are not playing, so choosing modular, clean-looking hardware makes everyday living easier.
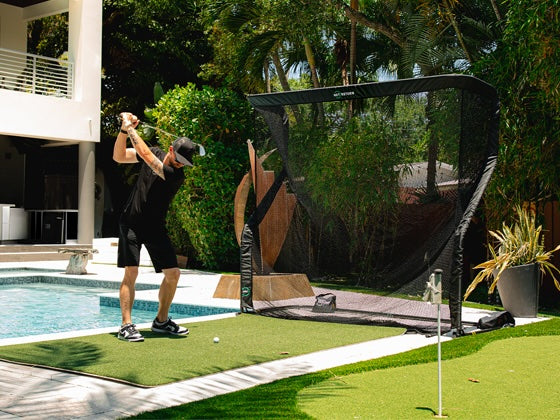
Choosing The Right Net, Screen And Enclosure For Your Bay
Once your room and layout are clear, choosing the actual bay hardware becomes a lot less overwhelming.
Net-Only Vs Full Enclosure
You have two main paths:
-
Net-Only Or Net + Screen Combo
Great for garages and flexible rooms where you want the option to hit into a net for quick practice or clip on a screen for full simulator sessions. -
Fixed Enclosure
Best for dedicated rooms where the bay will always stay up and you want a fully wrapped, cinema-like feeling with dark side walls and ceiling.
Impact Screen Quality
Impact screens carry a lot of responsibility:
-
They must handle high ball speeds without tearing or stretching badly.
-
They should minimize bounce-back.
-
They should provide a clean image when you project onto them.
Cheap fabric can work for a short time, but if you are serious about playing simulated rounds or practising often, it is worth choosing a screen designed specifically for golf.
Side Barriers And Valences
Side and top valences:
-
Improve safety by catching shots that miss the main screen.
-
Improve picture quality by darkening the area around the projected image.
Many people are surprised how much more immersive their simulator feels once the sides are covered and ambient light is controlled.
How We Think About This At The Net Return
When we design our nets and simulator enclosures at The Net Return, we build them so golfers can start with a practice net, then add a screen kit or simulator series enclosure later without rebuilding the entire bay. That way your first net can grow into a full indoor golf simulator as your space, budget and ambitions grow, instead of becoming something you have to throw out.
Common Indoor Simulator Bay Mistakes (And How To Avoid Them)
The good news is that most serious problems with simulator bays are predictable. Here are some that we see repeatedly, along with how to sidestep them.
Underestimating Depth
People often look at the screen width and forget:
-
The gap behind the screen.
-
The tee-to-screen distance.
-
The space behind the golfer.
The result is a tee jammed too close to the screen or a player wedged against the back wall. Always add those three numbers up before you commit to a room.
Ignoring Ceiling Height
Trying to build a bay under a low ceiling is tempting, especially in basements, but if the ceiling is too low you end up:
-
Avoiding the driver entirely.
-
Adapting your swing unconsciously to avoid hitting something above you.
Both outcomes defeat the purpose of having a simulator. Measure carefully and be honest about whether your room is truly “driver safe”.
Projector Shadows And Glare
Mounting the projector directly above or behind the ball can create:
-
Large shadows when you swing.
-
Glare in your eyes if the beam crosses your field of vision.
Moving the projector forward, slightly towards the screen and a touch to one side, almost always produces a cleaner result.
No Plan For Side Safety
It is easy to focus on the big screen and forget that a wild shot can travel sideways even faster than forwards. Skipping side nets or curtains next to a wall, window or television is one of the quickest routes to regret.
Using A Random Net Not Designed For Simulators
Some general-purpose nets are fine for the occasional wedge, but:
-
They may not handle thousands of full-speed driver shots.
-
They may not integrate well with a screen or enclosure.
-
They may not control bounce-back in a tight room.
A net or enclosure that is built with simulators in mind will save you a lot of anxiety once you start hitting real shots into it regularly.
Putting It All Together: A Simple Checklist Before You Order Anything
Before you order a single piece of equipment for your indoor golf simulator bay, run through this checklist with a tape measure in hand:
-
Have you measured ceiling height, room width and room depth accurately, including beams and sloping ceilings?
-
Can you create at least 12 inches behind the screen or net, 10-12 feet from tee to screen, and 6-7 feet behind the golfer?
-
Do you have enough width to swing freely and, ideally, to accommodate both right- and left-handed players?
-
Have you chosen where your launch monitor will sit and made sure nothing blocks its view?
-
Do you have a clear projector mounting point with the right throw distance and a cable path that does not cross the hitting zone?
-
Have you planned for side protection, especially if there are walls, windows or cars nearby?
-
Is the floor in front of the screen or net protected and ready to absorb impact noise and ball roll?
-
Have you thought about who will walk through this room and how you will keep them out of the bay during use?
-
Do you know whether you want a portable net-based bay or a permanent enclosure?
Once these answers are on paper, the whole project becomes less of a guess and more of a straightforward build. At The Net Return, these are exactly the questions we walk through with golfers when they send us photos and room dimensions, and the same questions can guide you as you turn a bare room into a simulator bay you actually trust and enjoy using.