
You’ve got (or you’re seriously thinking about getting) a Net Return.
Maybe it’s a Junior or Mini tucked into a spare room.
Maybe it’s a Home net in your garage.
Maybe you’ve gone big with Pro, Pro 8, Pro 9, Pro 10, or Pro XL in a sim room.
Either way, the big question hits you:
Okay… now what do I actually do with this thing to get better?
You stand there, hit a few balls into the net, the ball comes rolling back nicely… and then you realize:
you don’t see the full ball flight, you don’t see where it lands, and if you’re not careful you’ll just end up bashing balls with no plan.
This blog fixes that.
We’re going to turn your Net Return into a real training station with:
-
8 detailed, at-home Net Return practice drills
-
Step-by-step instructions for each
-
What each drill fixes in your swing or scoring
-
How to combine them into a simple weekly routine
-
Which drills pair best with Junior, Mini, Home, Pro, Pro 8, Pro 9, Pro 10, Pro XL
By the end, you won’t just have a net.
You’ll have a complete indoor practice system.
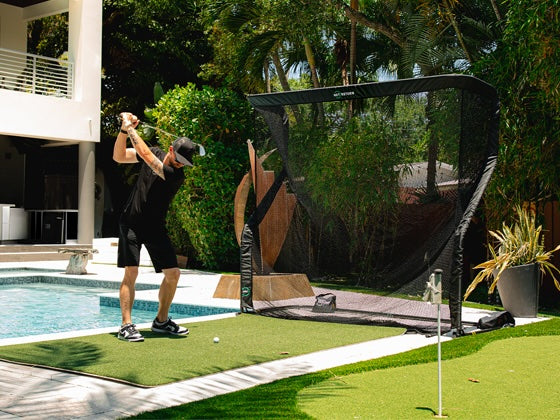
Why Practicing With A Net Return Is Different
Practicing with a Net Return is not the same as hitting balls at the driving range or into a cheap backyard net.
A few key differences matter for your training:
You Get Serious Reps Fast
Because the ball comes back to you, you don’t waste time walking around collecting balls.
You can:
-
Hit 50-100 balls in a short session
-
Practice every day at home
-
Work on mechanics, tempo, or feels without worrying about where the ball ends up
This is a huge advantage over the range. But it can also be dangerous if those reps are random and unstructured.
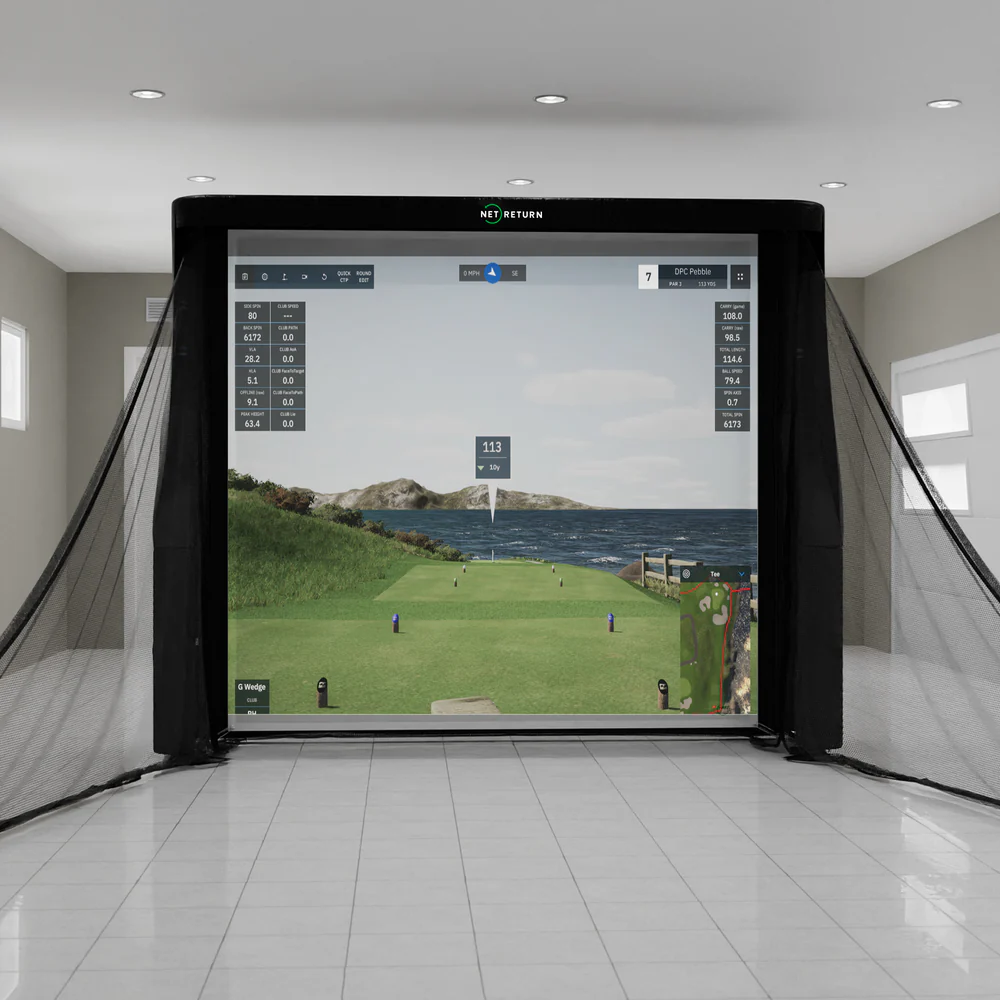
You Lose Full Ball Flight (Unless You Have A Monitor)
With only a net:
-
You can’t see exactly how far the ball flies
-
You can’t fully see the exact curve (left/right)
-
You don’t get that visual satisfaction of watching a shot land
So to make your net return golf drills actually useful, you need:
-
Structure - drills that aim at a specific skill
-
Feedback - sound, strike, ball return path, or data from a launch monitor
-
Repetition - repeating the right patterns instead of the wrong ones
The Net Return Itself Gives You Feedback
Because of the way a Net Return is designed, you can use it as a feedback tool:
-
The sound of impact into the net tells you a lot about strike (solid vs thin vs fat)
-
The ball return path (slightly left, slightly right, dead straight) gives you clues about your shot shape
-
The height on the net where the ball hits tells you if you’re ballooning shots or trapping them too low
Once you know how to read that, your net becomes much more than a rebounder.
It becomes your practice partner.
How To Get The Most Out Of Net Practice Before Any Drill
Before we jump into the drills themselves, let’s quickly set your practice up the right way so every minute you spend with a ball and club does real work for your game.
Step 1 - Make Sure Your Setup Is Safe And Comfortable
I won’t repeat the entire space/clearance guide here, but as a minimum:
-
You should be far enough from the net that the ball has time to slow down before hitting it
-
You should have enough height to swing your chosen club without fear
-
If you’re indoors, you really should use side barriers (especially in smaller rooms)
-
Nothing fragile (TVs, mirrors, glass doors) should be in the oops, I shanked it zone
If any of that feels sketchy, fix the setup first.
Step 2 - Use Simple Training Tools
You don’t need a full studio of gadgets. A few basics go a long way:
-
Alignment sticks
-
For aim, ball position, and swing direction
-
Impact tape or foot spray
-
To see where on the clubface you’re hitting
-
Launch monitor or sim (if you have one)
-
For distance and spin on wedge and driver drills
-
Masking tape / dots / markers
-
To create gates, windows, and targets on or in front of the net
-
A towel
-
For the classic ball-first-contact drill
Lay these out near your Net Return so you can grab them quickly.
Step 3 - Warm Up Before You Go At It
Just because you’re only in the garage doesn’t mean your body is warmed up.
A simple pre-practice routine:
-
2-3 minutes of mobility
-
Arm circles
-
Torso twists
-
Hip circles
-
5 slow rehearsal swings with a wedge or 7-iron
-
Then move into Drill 1 - Daily Warm-Up And Tempo Drill (we’ll get to that in a second)
Warm muscles and joints + easy tempo = better swings and reduced injury risk.
The 8 Essential Net Return Practice Drills
Here are your eight core Net Return practice drills.
They are:
-
Daily Warm-Up And Tempo Drill
-
Alignment And Posture Drill
-
Clock Drill For Wedge Distance Control
-
Towel Drill For Pure Iron Contact
-
Alignment Stick Extension Drill For Rotation And Path
-
Figure Eight Drill For Shallow, Inside-To-Out Swings
-
Chipping And Pitching Target Drill
-
Driver Fairway Window And Ball Return Feedback Drill
You don’t have to do all eight every time.
Think of them as your toolbox.
Drill 1 - Daily Warm-Up And Tempo Drill
Goal:
Get your body moving, find a smooth rhythm, and stop yourself from going full send on the first ball.
Best for:
Every player, every session. Works with Junior, Mini, Home, Pro, Pro 8, Pro 9, Pro 10, Pro XL.
What You Need
-
Your Net Return
-
One club (7-iron or 8-iron is ideal)
-
Optional: a metronome app or just a simple count in your head
How To Do It
-
No-Ball Phase (Movement First)
-
Stand in your hitting position without a ball.
-
Make 5-10 very slow, deliberate swings.
-
Focus only on:
-
Balance at the finish
-
Smooth tempo (no snatch-y takeaway)
-
Half-Speed Phase (With Balls)
-
Place 10 balls down.
-
Hit them at 50-60% speed.
-
Use a simple rhythm in your head:
-
1 to the top of the backswing
-
2-3 down and through
-
Normal-Speed Phase
-
Now hit another 10-15 balls at normal speed.
-
Keep the same rhythm count; don’t let it turn into “1-2.5” (rushed).
What To Pay Attention To
-
Are you finishing in balance or falling off your lead foot/toes?
-
Does the sound of impact become more consistent as you settle into tempo?
-
Does the ball return to roughly the same spot each time?
If all you did was this drill three or four times a week, your swing rhythm would probably improve noticeably.
Drill 2 - Alignment And Posture Drill
Goal:
Aim where you think you’re aiming… and start from a strong, consistent setup.
Without this, every other drill gets messy.
Best for:
All players; especially good with Mini, Home, Pro Series where you have some width in front of you.
What You Need
-
2 alignment sticks (or two spare clubs)
-
Your Net Return and hitting mat
-
Optional: mirror or phone camera
How To Set It Up
-
Lay the first stick on the ground, parallel to the net, pointing straight at the centre.
-
Lay the second stick along your toe line, parallel to the first, a few inches inside.
-
Put the ball centrally between them.
You now have a little railway track on the ground.
How To Run The Drill
-
Take your normal stance with the ball centred relative to your club choice.
-
Check:
-
Are your toes parallel to the target line stick?
-
Is your clubface square to that line?
-
Use a mirror or phone set on a chair to quickly check:
-
Spine tilt (not perfectly vertical, slight forward tilt)
-
Neutral knee flex
-
Arms hanging naturally from your shoulders
Then:
-
Hit sets of 10 balls where your only focus is:
-
Same setup every time
-
Same alignment
No fancy swing thoughts. Just repeatable posture and aim.
Why This Works So Well With A Net
A lot of range sessions get wasted because you can’t see your aim clearly and you subconsciously adjust to where the ball is going.
With a net:
-
The target is fixed
-
Your ground lines (alignment sticks) are clear
-
You can train your brain to get used to what correct alignment and posture feel like
Do this at the start of most sessions. It’s like calibrating your system.
Drill 3 - Clock Drill For Wedge Distance Control
Goal:
Build a reliable wedge matrix so you know how far your wedges go with different swing lengths.
This is the famous Clock Drill, adapted to your Net Return.
Best for:
Any model, but especially Mini, Home, Pro where you can hit a lot of wedges into the net. If you have a launch monitor, this drill becomes insanely powerful.
What You Need
-
One or two wedges (e.g., 54° and 58° or 50° and 56°)
-
Your Net Return
-
Ideally a launch monitor (even a basic one) - but you can still do it without
-
Notebook or notes app
The Clock Concept
Imagine your lead arm as the hand of a clock when you look at yourself from the side:
-
8 o’clock - small pitch
-
9 o’clock - medium pitch
-
10 o’clock - bigger pitch
The idea is:
-
Same tempo
-
Same effort
-
Only the backswing length changes
How To Run The Drill (With A Launch Monitor)
-
Pick your first wedge.
-
Do three backswing lengths:
-
8 o’clock
-
9 o’clock
-
10 o’clock
-
For the 8 o’clock swing:
-
Hit 5 balls
-
Note the average carry
-
Repeat for 9 o’clock and 10 o’clock
-
Write it down. Example:
-
SW @ 8 o’clock -> 35 yards
-
SW @ 9 o’clock -> 50 yards
-
SW @ 10 o’clock -> 65 yards
Repeat with your second wedge.
How To Run It (Without A Launch Monitor)
You won’t see distance, but you can still:
-
Lock in the feel of those three lengths
-
Use those feels later on the course to hit soft 50 or soft 70 yarders
-
Keep the same tempo and rhythm each time
How To Progress It
-
Once you have your numbers/feels, play the ladder game:
-
Hit 2 balls with 8 o’clock
-
Then 2 with 9 o’clock
-
Then 2 with 10 o’clock
-
Then back down 9 -> 8
-
Your aim is to make each pair feel exactly the same.
Over time, this gives you a distance control superpower with your wedges.
Drill 4 - Towel Drill For Pure Iron Contact
Goal:
Learn to hit the ball first, ground second, stop fat shots, and control your low point.
This is the classic Towel Drill, tailored for your net.
Best for:
Any model, but especially useful with Home, Pro and Pro Series where you can comfortably make full swings with mid-irons.
What You Need
-
A mid-iron (7-iron or 6-iron)
-
A small towel
-
Your Net Return and mat
-
Optional: impact tape or spray on the clubface
How To Set It Up
-
Place the ball on your mat.
-
Put the towel on the ground 3-4 inches behind the ball (closer for shorter irons, slightly farther for longer).
-
The towel should be flat, not bunched up.
How To Run The Drill
-
Take your normal stance.
-
Hit shots with one simple rule:
-
Do not hit the towel.
-
Start with:
-
Small half-swings
-
Then build to three-quarter and full swings as you get comfortable
If you hit behind the ball (fat), your club will smack into the towel first. Immediate feedback.
What To Feel
-
Your weight moving a bit more into your lead side through impact
-
Chest and hips rotating, not stalling
-
Hands and handle slightly ahead of the clubhead at impact
You’ll notice:
-
Cleaner sound into the net
-
More solid feel
-
Ball leaving the face with a more compressed sensation
Combine this drill with a few swings checking impact location on the face and you’ve got a very strong iron contact drill.
Drill 5 - Alignment Stick Extension Drill For Rotation And Path
Goal:
Fix early release and flippy hands, encourage better rotation, and improve club path awareness.
This is the Alignment Stick Extension Drill - simple, but brutally honest.
Best for:
Players who tend to scoop or flip at impact, or anyone wanting a stronger body-driven swing. Works with all Net Return models.
What You Need
-
One club (7-iron is great)
-
One alignment stick
-
Some space to swing without the stick catching your side too early
How To Set It Up
-
Slide the alignment stick into the butt end of your grip so it extends up along your lead side (or trail side, depending on the variation you prefer).
-
The stick should stick out a good 1-2 feet past the end of the grip.
How To Run The Drill
-
Take your stance with no ball to start.
-
Make slow swings where you focus on:
-
Turning your chest and hips through the ball
-
Keeping your arms and hands in sync with your body
-
Watch/feel the stick:
-
If you throw your hands too early (flip), the stick will bump into your side or ribs too soon.
-
If you rotate properly, the stick clears your body without jabbing you.
Once you get the feel:
-
Add a ball
-
Hit half-speed shots at first
-
Gradually increase speed as you stop bumping yourself
What This Trains
-
Better sequence (turning the body, not just throwing hands)
-
More forward shaft lean at impact
-
A more stable clubface, which leads to straighter start lines
It’s uncomfortable at first, but in a very good way.
Drill 6 - Figure Eight Drill For Shallow, Inside-To-Out Swings
Goal:
Help you feel a more shallow, inside-to-out swing path, especially if you fight a slice.
This is the Figure Eight Drill, adapted for your Net Return.
Best for:
Players who slice or swing over the top. Pro Series models (Pro, Pro 8, Pro 9, Pro 10, Pro XL) are nice here because extra width gives you more confidence, but you can do it with Mini or Home too.
What You Need
-
One club (7-iron or 5-iron works well)
-
A bit of imagination (or some ground markers)
-
Your Net Return and mat
The Concept
You’re going to draw an invisible figure eight with the clubhead in the air to teach your hands and arms a more rounded, shallower move.
How To Run The Drill
-
Without a ball, get into your golf stance.
-
Swing the club back to waist height, then gently trace a sideways “8” pattern:
-
Slightly out, then back in, then through
-
The “lower loop” of the 8 represents the area where the club should be shallow and approaching the ball from the inside.
Once that shape feels somewhat normal:
-
Add a ball.
-
Make a rehearsal “Figure Eight” move just before your real swing.
-
Hit the ball trying to recreate the shallow, inside feel.
Do sets of 5-10 balls:
-
Don’t worry about distance
-
Focus entirely on:
-
Path feeling rounder, not steep
-
Club approaching the ball from inside your target line
Bonus: Combine With Ball Return Feedback
Watch how the ball rolls back from the net:
-
Always rolling back to the right of your straight line? You might be overdoing inside-to-out (big draws/hooks).
-
Always left? Still too over-the-top/slicey.
Use that to refine the feel: find your comfortable, slight draw or soft fade zone.
Drill 7 - Chipping And Pitching Target Drill
Goal:
Sharpen your short game - clean contact, consistent trajectory, and start line - using your Net Return as a chipping/pitching target.
This works brilliantly with Junior, Mini, Home, and of course Pro models as well.
What You Need
-
One or two wedges (e.g., PW and 56°)
-
Your Net Return
-
Some visual targets on the net:
-
Bits of tape
-
Printed target sheet
-
Marked logo area
How To Set It Up
-
Move closer to the net (3-5 metres).
-
Mark:
-
A low target near the bottom of the net (for bump-and-run chips)
-
A higher target mid-net (for standard pitches)
How To Run The Drill
Phase 1 - Low Chips
-
Use a lower-lofted club (e.g., PW or 9-iron).
-
Hit 10 balls trying to land them into the low target area.
-
Focus on:
-
Quiet hands
-
Small, controlled motion
-
Striking the ball before the turf
Phase 2 - Medium Pitches
-
Switch to a lofted wedge (e.g., 54-58°).
-
Aim at the higher target on the net.
-
Hit 10 balls:
-
Slightly longer swing
-
Smooth tempo
-
Consistent height
Turn It Into A Game
-
Game 1: Target Count
-
10 balls. How many times can you hit the target (or within a tape box)?
-
Game 2: Up-And-Down Simulation
-
Imagine each chip/pitch has to get inside a close zone (target).
-
Track how many out of 10 would have given you a makeable putt in real life.
This simple drill makes your short game way less random and turns your net into a proper short-game training wall.
Drill 8 - Driver Fairway Window And Ball Return Feedback Drill
Goal:
Tighten up your driver dispersion and build a stock shot you can trust on the course.
This is a combination of:
-
A fairway window drill
-
A structured ball return feedback routine
Best for:
Any model that can handle your driver - Home is okay if your space/ceiling allows, but Pro, Pro 8, Pro 9, Pro 10, Pro XL are ideal thanks to the extra width.
What You Need
-
Driver
-
Your Net Return
-
Two vertical fairway posts on the net (tape lines or markers)
-
A small marker on the floor showing where a straight ball normally rolls back
How To Set It Up
-
Mark two vertical lines on the net, roughly creating a fairway window in the centre.
-
On the floor, place a strip of tape where a dead-straight ball tends to roll back to after hitting the net.
How To Run The Drill
-
Hit a set of 10 drivers.
-
Score each shot:
-
2 points - hits within the fairway window
-
1 point - clips one of the posts
-
0 points - outside the window
-
After each shot, watch:
-
Does the ball roll back on your floor line?
-
Slightly left or slightly right?
Over time:
-
You’ll see a pattern (e.g., small push-fades, or little draws)
-
You can decide if that’s your preferred stock shot or if you want to nudge it straighter
Make It Competitive
-
Start with a target: e.g., 12 points out of 20 (average 1.2 points per shot).
-
Try to beat your own high score each week.
-
If you use a launch monitor, track:
-
Clubface angle
-
Path
-
Start line metrics
This turns “just smashing drivers into a net” into a structured driver accuracy drill.
How To Turn These Drills Into A Weekly Net Return Routine
You now have eight powerful drills. The trick is using them without overwhelming yourself.
Here’s a simple way to turn them into a weekly indoor golf practice routine.
Option 1 - Three Sessions Per Week (30-45 Minutes Each)
Session A - Mechanics And Contact
-
Drill 1 - Daily Warm-Up And Tempo (5-10 minutes)
-
Drill 2 - Alignment And Posture (10 minutes)
-
Drill 4 - Towel Drill For Pure Iron Contact (10-15 minutes)
-
Drill 5 - Alignment Stick Extension Drill (10 minutes)
Session B - Wedges And Short Game
-
Drill 1 - Daily Warm-Up And Tempo (5-10 minutes)
-
Drill 3 - Clock Drill For Wedge Distance Control (15-20 minutes)
-
Drill 7 - Chipping And Pitching Target Drill (10-15 minutes)
Session C - Path And Driver
-
Drill 1 - Daily Warm-Up And Tempo (5-10 minutes)
-
Drill 6 - Figure Eight Drill For Shallow, Inside-To-Out Swings (10-15 minutes)
-
Drill 8 - Driver Fairway Window And Ball Return Feedback Drill (15-20 minutes)
Option 2 - Short Daily Sessions (20-25 Minutes)
If you prefer to practice almost every day:
-
Day 1: Drills 1, 2, 4
-
Day 2: Drills 1, 3, 7
-
Day 3: Drills 1, 5, 6
-
Day 4: Drills 1, 8
-
Repeat / rest as needed
How To Track Improvement
You don’t need anything fancy. Just pick 2-3 metrics:
-
Clock Drill:
-
Your backswing clock positions + carry averages (if using a monitor)
-
Towel Drill:
-
How many consecutive balls you can hit without touching the towel
-
Chipping Target Drill:
-
Target hits out of 10
-
Driver Fairway Window:
-
Your points per 10-shot set
Write them down once a week. Watch the numbers slowly climb.
That’s how you know your Net Return practice drills are actually changing your game.
Which Net Return Models These Drills Work Best With
Quick guidance so you can see how your specific net fits into this drill system.
Junior
-
Ideal For:
-
Kids, tight bedrooms, very low ceilings
-
Best Drills:
-
Drill 1 - Daily Warm-Up And Tempo
-
Drill 2 - Alignment And Posture
-
Drill 3 - Clock Drill (but with short wedges / half swings)
-
Drill 7 - Chipping And Pitching Target
You’ll keep clubs shorter and swings smaller, but the fundamentals are exactly the same.
Mini
-
Ideal For:
-
Apartments, small garages, multipurpose rooms
-
Best Drills:
-
1, 2, 3, 4, 5, 7
-
Notes:
-
Use foam balls if noise or safety is a concern
-
You might limit driver work (Drill 8) depending on ceiling height and room length
Home
-
Ideal For:
-
Standard garages, basements, backyards
-
Best Drills:
-
All 8 drills can work, especially if your ceiling height is decent
-
Notes:
-
Home is a brilliant all-rounder for golf net practice drills - wedges, irons, and driver (if space allows).
Pro, Pro 8, Pro 9, Pro 10, Pro XL
-
Ideal For:
-
Serious home setups, sim rooms, coaching bays
-
Best Drills:
-
All 8 drills, especially:
-
Drill 6 - Figure Eight Drill (you’ll appreciate the extra lateral space)
-
Drill 8 - Driver Fairway Window (wider face = more realistic fairway)
-
Notes:
-
If you use a launch monitor or full simulator with a Pro Series net, Drills 3 and 8 become extremely data-rich and powerful.
Whichever model you have, you can build a meaningful, structured practice routine with these drills. The bigger nets just open more room for driver and path work; the smaller ones shine for wedges, chipping, and mechanics.
Final Take - Make Your Net Return A Real Practice Station, Not Just A Rebounder
A Net Return on its own is hardware.
These 8 drills are the software that makes the hardware worth it.
If you:
-
Warm up properly (Drill 1)
-
Keep your setup honest (Drill 2)
-
Learn your wedge distances (Drill 3)
-
Clean up your iron strike (Drill 4)
-
Improve your rotation and path (Drill 5, Drill 6)
-
Sharpen your short game (Drill 7)
-
Tighten your driver dispersion (Drill 8)
…then every session in front of your net is doing targeted work on parts of your game that actually lower your scores.
You won’t just be hitting into a net.
You’ll be running your own at-home training program with a clear purpose every time you pick up a club.
Save these drills.
Build your weekly routine.
And let your Net Return become what it was meant to be:
Not just a thing the ball bounces off…
but your home practice engine for real, lasting improvement.